
Using Views and Perspectives in Google Earth Desktop
Tutorial Contents
Prerequisites
Absolutely no programming skills needed!
In April 2017, Google Earth on Web was released, which puts Earth on the browser. However, for this tutorial, you will need Earth for Desktop installed on your computer. Download the latest version here.
Let's Get Started!
- Open Google Earth.
- Download the sample data to use during this tutorial, and open it in Google Earth. For this exercise, make the Terrain layer visible. Go to the Layer Panel, and scroll to the bottom. Check the box next to Terrain to make it visible.
Create Snapshot Views
-
Notice how there is no unique camera angle, or perspective, set for the placemarks -- when you double-click on a placemark, the Earth doesn't tilt or rotate to a unique perspective.

-
Use the mouse or the navigation tools to orient the Earth to a unique perspective for a placemark. For example, zoom into the placemark labeled “Flirt”, and tilt and rotate the Earth to a unique perspective.
-
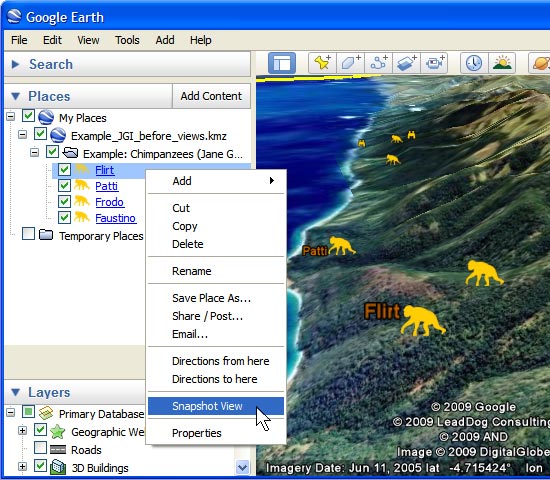
Right-click on the “Flirt” placemark in the Places panel, and select Snapshot View. This will save your unique camera angle, or perspective, for this placemark.
Using Snapshot Views can be very effective for telling stories and guiding users through your Google Earth layer in a controlled manner, helping them get the unique perspectives you want them to see.
-
You can also set the Snapshot View in the Properties window click on the Snapshot current view button, as shown below. To open the Properties, right-click on the placemark in the 3D viewer or in the Places panel, and choose Properties (on a PC) or Get Info (on a Mac). Go to the View tab, and click the Snapshot Current View button.

Now, when you double-click on that placemark in the 3D viewer or in the Places panel, Google Earth will fly to that saved view, or perspective.
-
You can also assign a Snapshot View to a folder. To do this, right-click on the folder in the Places panel, and choose Snapshot View.

Now when you double-click on the folder in the Places panel, Google Earth will fly to that saved view, or perspective. Here is what the finished product might look like with saved snapshot views.
Discussion and Feedback
Have questions about this tutorial? Want to give us some feedback? Visit the Google Earth Help Community to discuss it with others.