


2010-2015 Chevrolet Camaro
How to upgrade the stereo system in your Camaro


In brief: This Crutchfield Research Garage article gives you an overview of your Camaro's stock stereo system and your aftermarket upgrade options. We'll tell you all about:
- The factory stereo system
- Removing the factory radio
- Removing the factory speakers
- Adding more bass
- Other options for your Camaro
Then, use our vehicle selector to find the gear that will fit your Chevy.
Overview of the Chevy Camaro
It's said that if you stick around long enough, everything will come back into style again. Somehow, the world just seems like a better place when vinyl records are popular, 3-2 baseball games are commonplace, and muscle cars can be heard rumbling around town on a Saturday night.
Ford started the whole retro muscle car craze with its 2005 Mustang, then Chrysler followed suit with the 2008 Dodge Challenger. In 2010, GM finally completed the trinity with a thoroughly modern muscle car inspired by the classic first-generation Camaros. Like its cross-town rivals, the Camaro is a remarkable synthesis of present-day performance and old-school style.
You won't find a push-button AM radio in today's Camaros, but if you want your stereo to sound as good as your car's exhaust note, you'll definitely want to upgrade. The Camaro offers numerous challenges to the would-be installer, but we're here to offer you the advice you need to get the sound you want. Installation-wise, the coupe and convertible are exactly the same until you get to the rear speakers, so those differences are noted where appropriate.
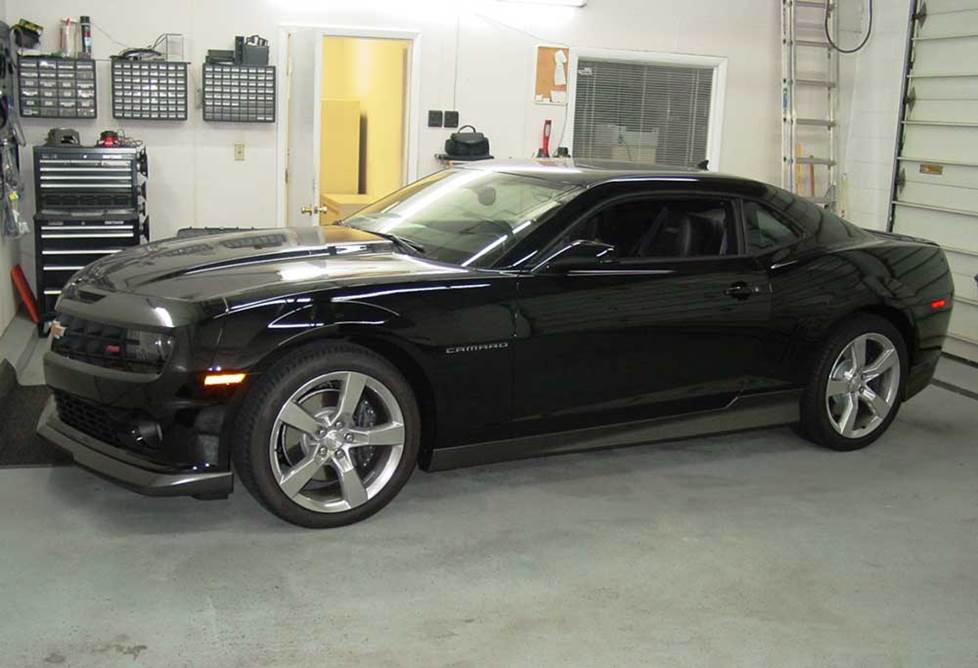
2010 Chevy Camaro coupe (Crutchfield Research Photo)
The factory stereo system
The Camaro's base stereo was a 6-speaker, 80-watt AM/FM/CD/MP3 audio system with XM satellite radio and an auxiliary audio jack. Buyers who opted for the Convenience and Connectivity package got plenty of both, with Bluetooth® connectivity (which eventually became standard equipment), steering-wheel-mounted audio controls, and a USB port.
The next level of stereo sound was a 245-watt, 9-speaker Boston Acoustics-branded system with an AM/FM/CD/MP3 receiver, XM satellite radio capability, steering-wheel-mounted controls, a USB audio interface and Bluetooth capability. GM's OnStar® system was, of course, present on all models. AUX and USB inputs for either system can be found in the center console storage compartment.
A rear view camera was added in 2012. In 2013, Chevy introduced a new MyLink touchscreen audio system, plus an optional MyLink-based GPS navigation system. We haven't had a chance to review a 2013 Camaro yet, so while we doubt there are significant changes to the stereo removal and replacement process, we don't know that for certain. Watch this space for updates.
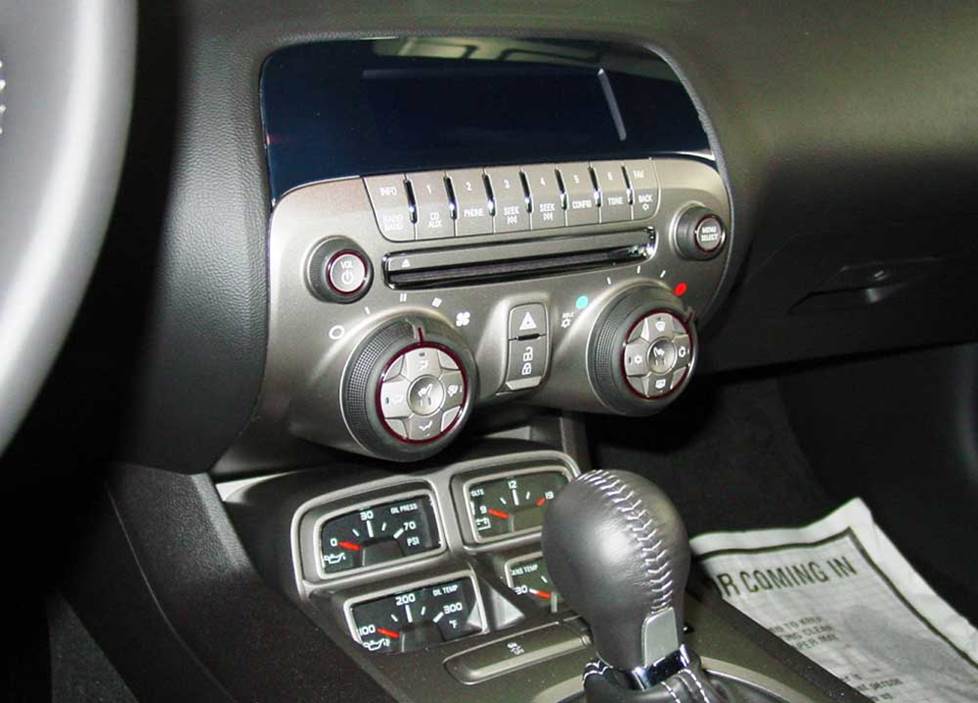
The Camaro's factory receiver (Crutchfield Research Photo)
Removing the factory radio
When shopping for a new receiver, you have a lot of options. Both single-DIN (2" tall) and double-DIN (4" tall) receivers will fit in your Camaro. You'll need a special integration package to install either size stereo without losing the lights, locks, climate controls, and OnStar. It's not a cheap kit by any means, but when you purchase your receiver from Crutchfield, you'll get a very nice discount on the purchase price
The Camaro's retro-modern styling is at once a proud glance back at GM's long, glorious past and a confident look forward to a bright future – which may or may not explain why the factory receiver looks like the front end of a '56 Buick.
Detailed stereo and speaker removal instructions

Pulling the front end of an actual Buick into this Camaro's interior would be more difficult than getting the stock receiver out. But not by much. The interior looks terrific, but it's awfully tight in there, so getting to the factory radio is a multi-step process that requires time, patience, and skill. Removing the radio means removing the center console and most of the lower half of the center dash stack. There are lots of screws to remove and panels to finesse, so this is not an easy job. Once you've installed the new receiver, you have to do it all again, backwards.
If you're an experienced do-it-yourselfer, you can probably handle this installation on your own with help from the detailed, illustrated Crutchfield MasterSheet™ that's included with your purchase. If not, you might want to hand the receiver and the MasterSheet over to a professional installer, leave a phone number where you can be reached, and enjoy the rest of the day. We don't want to seem overly negative, but we do want you to know what you're getting into.
Tools needed: Panel tool, small flat blade screwdriver, socket wrench and extension, 7mm socket, Phillips screwdriver
Read our Car Stereo Buying Guide for shopping tips and advice.
Shop for car stereos that fit your Chevrolet Camaro
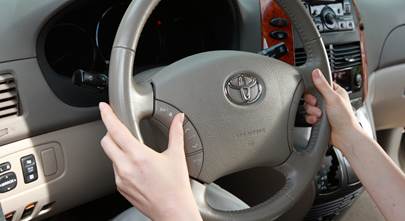
Steering wheel audio controls
In most cases, it's reasonably easy to retain your Camaro's steering wheel audio controls when you install a new stereo. When you enter your vehicle information, our database will choose the adapter you need to make your factory steering wheel controls work with a compatible aftermarket receiver.
Removing the factory speakers
The Camaro has speakers in the doors, the dash, the rear deck, and the rear side panel area.
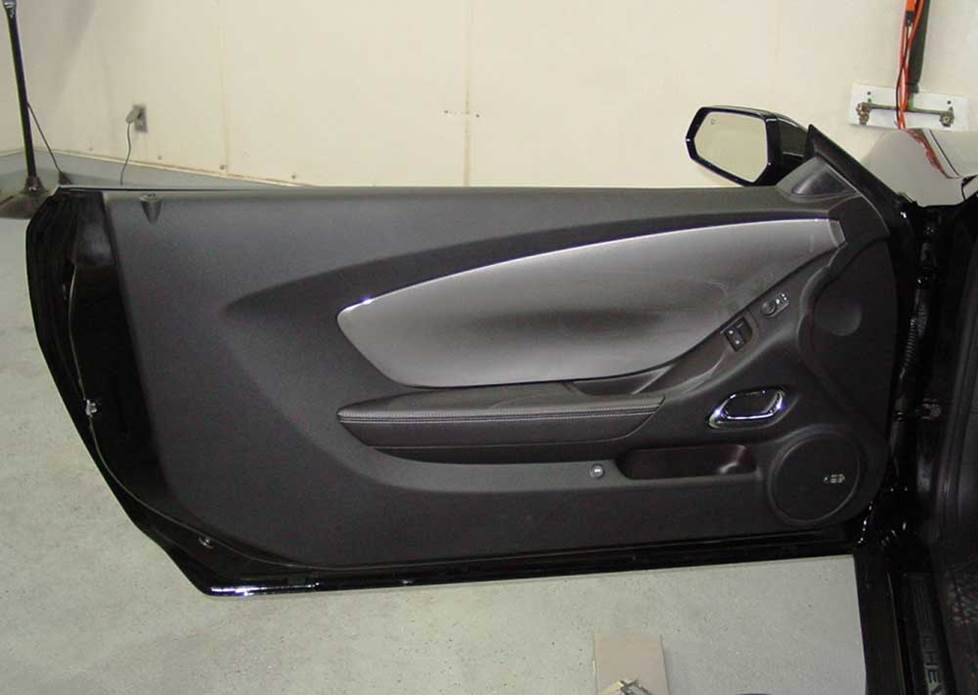
The Camaro's front door (Crutchfield Research Photo)
Removing the door speakers
Whether your Camaro has the base or Boston Acoustics system, you'll find a set of component speakers inside the massive doors. You'll need to remove the door panels, but other than that, the speakers are reasonably easy to reach and replace with the help of your MasterSheet.
To remove the door panels, you'll start by prying up the tweeter housing to release three clips. Disconnect the wiring harness and remove the housing. Moving down the door, you'll then remove one Torx T30 screw that's inside the door pull cup. Pry out the screw cover behind the door release and remove one 7mm screw.
Next, you'll remove two 7mm screws along the bottom of the door panel and one 7mm screw at the upper front corner of the door panel. With the panel loosened, gently pry around the edges with a panel tool to release 13 retaining clips, pull out the panel, and disconnect the harnesses and door release cable. Be sure to place the panels somewhere safe while you're swapping out the speakers.
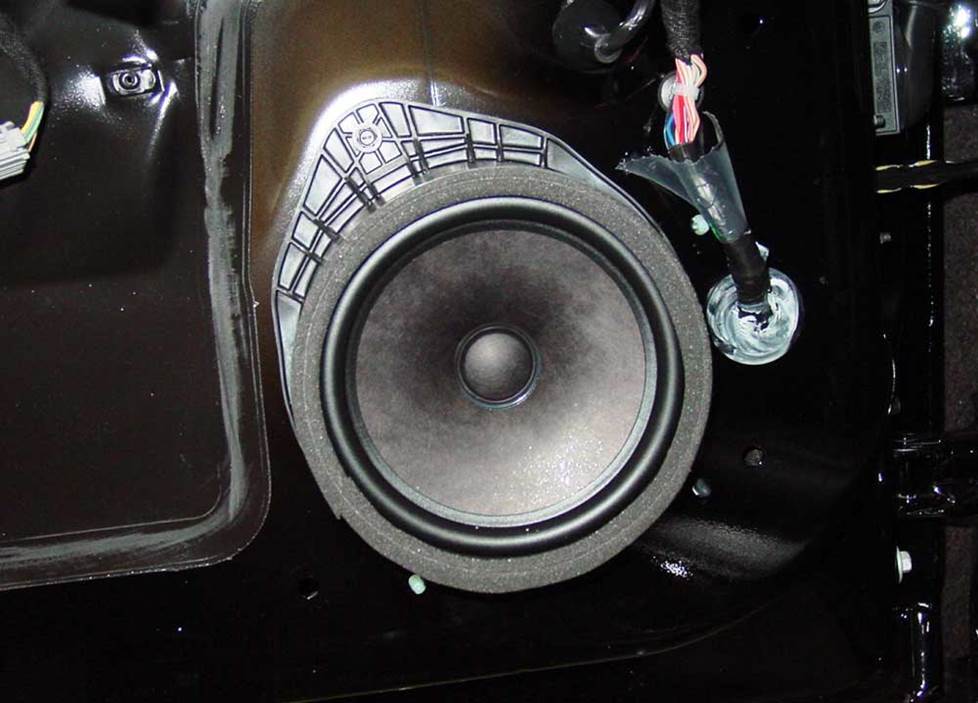
The Camaro's stock woofer (Crutchfield Research Photo)
The stock woofers, regardless of system, are 6-3/4" units. You can replace them with a wide variety of 6-1/2" or 6-3/4" models, with the help of speaker adapter brackets included free with your purchase. We also include a Crutchfield wiring harness, so you can install your speakers without the hassle of cutting into the factory wires.
The tweeters are just over 1-1/2" in diameter and a number of component system tweeters will fit nicely. They're easy to remove, but you'll either need to fabricate a mounting bracket or use our universal backstrap to secure them in place. A wiring harness isn't available either, so you'll need to splice the vehicle's speaker wires to your new speaker's wires, or use PosiProducts wire-tapping connectors.
Tools needed: Panel tool, Phillips screwdriver, small flat blade screwdriver, Torx T30, 7mm socket, socket wrench and extension
The center dash speaker is easy to get to, but you might not want to bother (Crutchfield Research Photo)
Removing the center dash speaker
The 3-1/2" center dash speaker that's part of the Boston Acoustics package is easy to get to and hard to replace, because there really aren't any replacements available. All things considered, it doesn't make a huge difference whether you leave it there or disconnect it. Installing a set of quality component speakers in the doors will do a lot more to improve your soundstage.
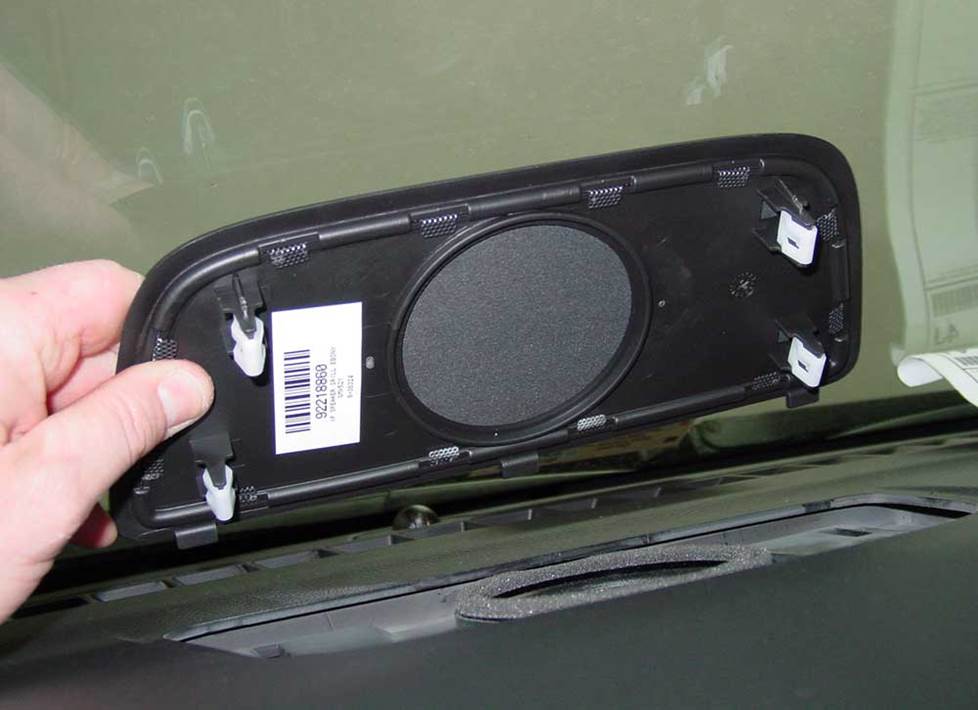
Getting there is not half the fun (Crutchfield Research Photo)
Removing the rear deck speakers (coupe)
The Camaro coupe's rear deck speakers measure 6"x9" and look absolutely terrific right there where they are. They sound nice, too, especially the Boston Acoustics versions. Nothing to improve upon here, so we'll just move on to…
Okay, okay…. Of course it's possible to improve upon the Camaro's rear deck speakers. There's no shortage of 6"x9" speakers that will fit perfectly and make the factory units sound like they came out of a wrecked Vega. The problem, quite frankly, is that the installation process is a…challenging, exciting project that builds character and teaches valuable life lessons. Ahem.
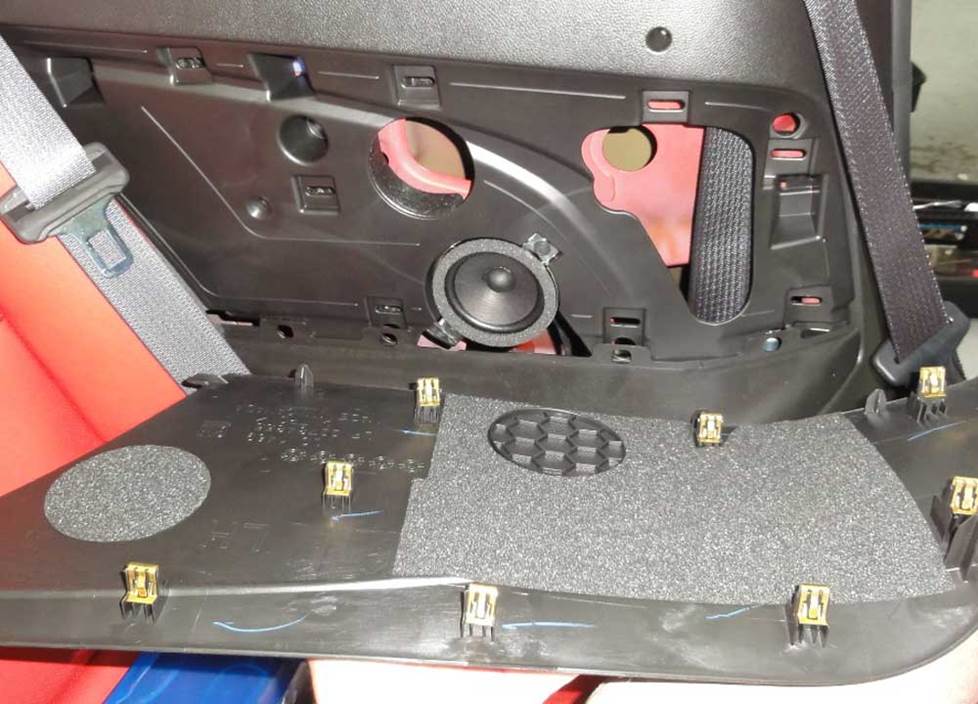
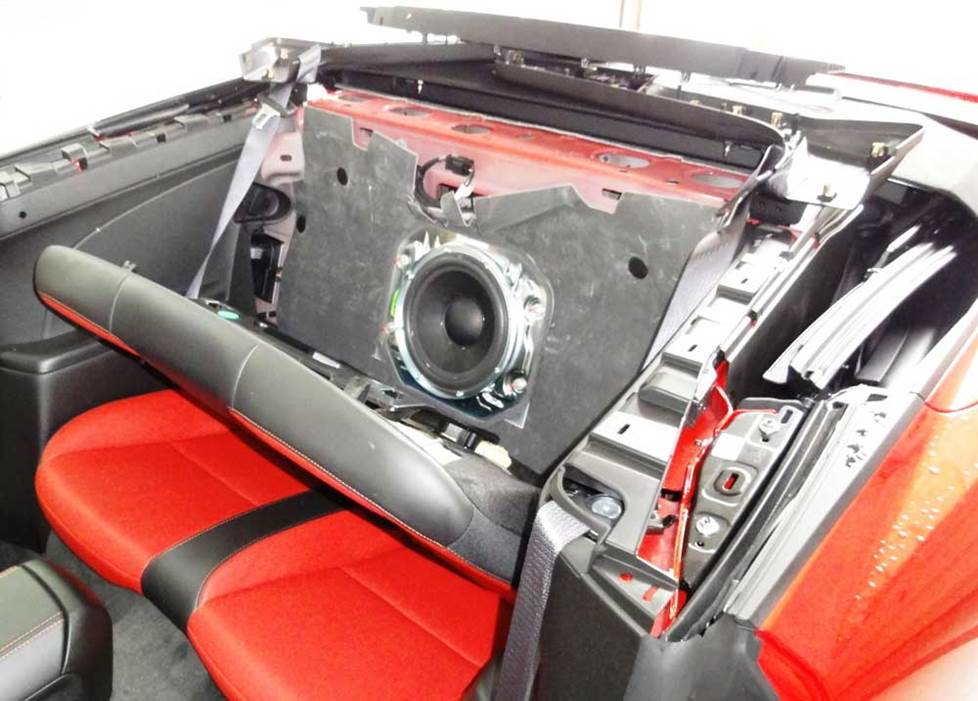
Removing deck-mounted speakers from the average coupe or sedan typically involves a bit of work, since it's usually necessary to remove the rear seat back, and maybe some trim panels and/or the lower cushion. It's not easy, but it's totally doable for anyone with some skills, common sense, and a few tools.
There's nothing average about the Camaro. Replacing the rear deck speakers involves an extensive disassembly process in which removing the seat bottom is merely Step One. There are other steps after that – lots of them. Basically, you're taking the entire rear half of the interior apart, replacing two speakers, then putting it all back together again. If you were doing this in a wagon or SUV, it would be tough enough, but doing it in a tightly-packaged coupe with a sloping rear window makes it even tougher.
And that's just for the base stereo. If your Camaro is equipped with the Boston Acoustics system, the rear tweeter is mounted in tandem with the rear woofer, and cannot be removed. These speakers are powered by a factory amplifier (located behind a trunk trim panel on the driver's side), which sends bass and treble to the speakers through separate sets of wires.
If you replace the factory radio with a new receiver, the factory amplifier will work fine with the factory rear speakers. However, if you want to replace the stock speakers, you'll have to replace the factory radio, AND bypass the factory amp by splicing together its input and output wires.
Needless to say, we recommend that you consult a car audio professional for this project. We don't want to quash your interest in do-it-yourself installation, but some cars require more than enthusiasm, a toolbox, and a Crutchfield Advisor on the other end of the phone. This is one of them. That said….
Tools needed: Panel tool, Torx T50 driver, 7mm, 15mm & 18mm sockets, socket wrench and extension, small flat blade screwdriver
The Camaro convertible's rear side speakers are much easier to deal with (Crutchfield Research Photo)
Removing the rear side panel speakers (convertible)
Camaro convertibles are equipped with 3-1/2", 2-ohm speakers in the rear seat side panels. They're reasonably easy to remove and replace, especially compared to everything else on this car. Starting at the front edge, pry out the rear side panel grille to release eight clips and remove them. Remove the two 7mm screws securing the speaker to the side panel, disconnect the harness and remove the speaker. A wiring harness is not available, so you'll need to splice the vehicle's speaker wires to your new speaker's wires or use a set of PosiProducts wire tap connectors.
Tools needed: Panel tool, 7mm socket, socket wrench and extension
Read our Car Speakers Buying Guide for more information.
Shop for speakers that fit your Chevrolet Camaro
Bass in your Camaro
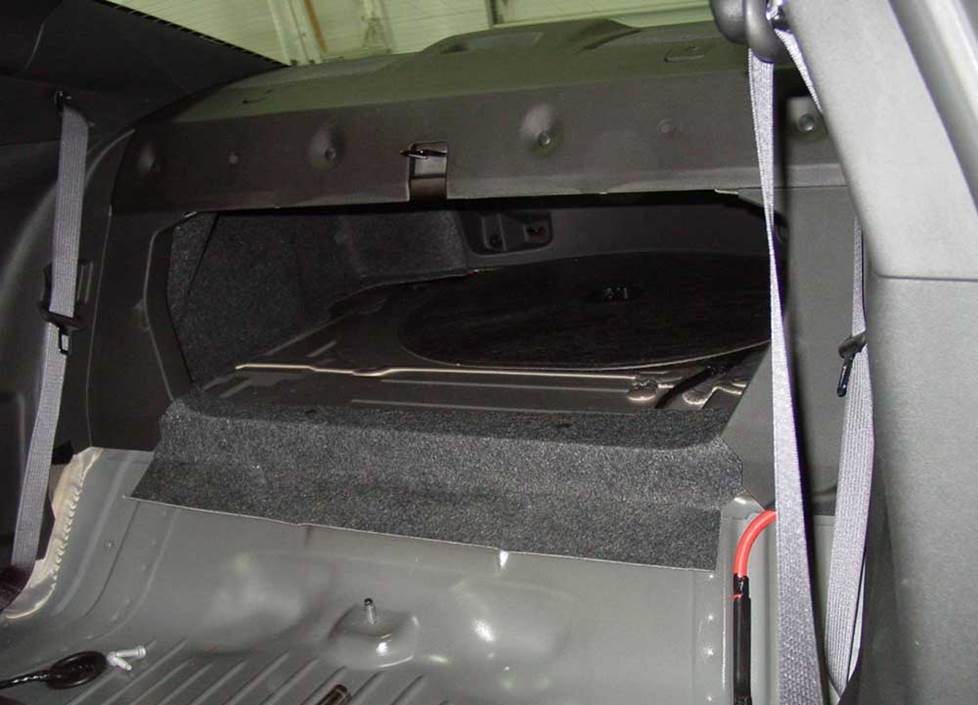
The convertible's sub is behind the rear seat (Crutchfield Research Photo)
Factory rear subwoofer (convertible only)
The Boston Acoustics system includes a 10" dual voice coil sub. This sub is located on the trunk wall, facing the back seat. It's not easy to get to, but it's easier than anything on the coupe! You will need to drill new screw holes to mount an aftermarket subwoofer, so be very careful and take all appropriate safety precautions before you start. Or, if you're not comfortable drilling into your prized Camaro, leave this job to a professional installer.
This sub receives only bass frequencies from the amplifier, so if you replace it, the aftermarket speaker will only reproduce bass.
Start by putting the top down, then pry up the rear seatbelt trim panel to release ten clips. Put the panel on the convertible top for safekeeping, then repeat the process on the opposite side. Pry up the upper trim panel in the center of the seat to release eight clips and remove that panel. Push down on the two metal clips securing the top of the rear seat back and fold the seat down. Remove eight Torx T25 screws that secure the subwoofer to the factory bracket, disconnect the harness and remove the subwoofer.
A wiring harness is not available, so you'll need to splice the vehicle's speaker wires to your new sub's connectors or use a set of PosiProducts wire tapping connectors.
Tools needed: Panel tool, Torx T25 driver, drill and 1/8" bit
Coupe
Thanks to the thriving aftermarket that sprang up around the new Camaro almost immediately, there are plenty of parts and pieces out there to make this car look wilder, go faster, and handle better. If you want to add bigger bass to your Camaro, you have some good options there, too.
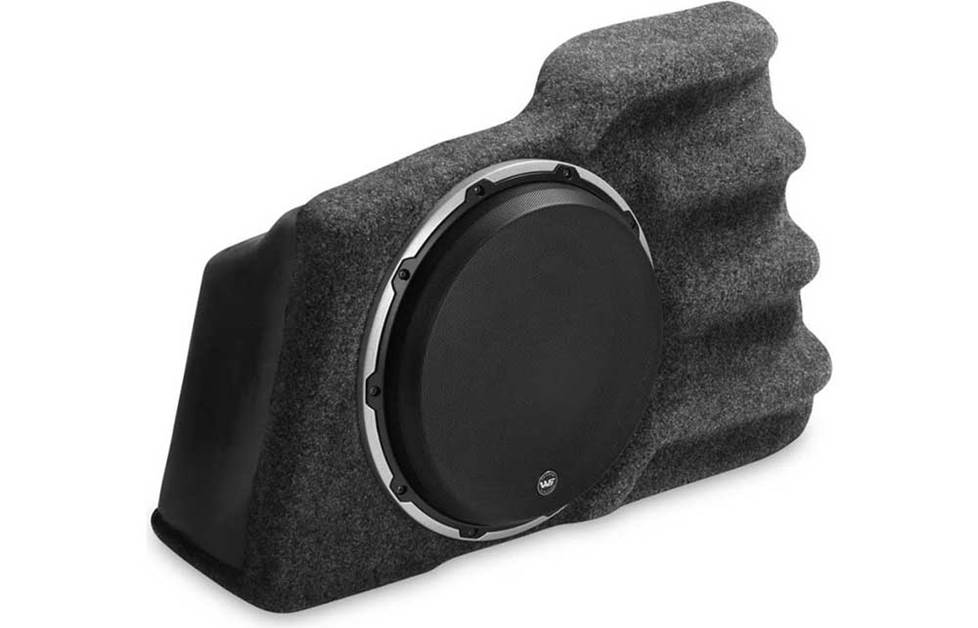
This JL Audio Stealthbox fits the Camaro coupe perfectly (JL Audio photo)
Installing a big sub box and component subwoofers isn't one of them. The Camaro's narrow trunk opening is the biggest impediment, but the internal dimensions are 14" high X 32" wide X 14" deep, so there's not much space anyway. Thankfully, you can still add plenty of bass with a powered subwoofer or you can choose one of the custom enclosures created by the aforementioned thriving aftermarket.
If you're a serious, hardcore bass lover, then consider the JL Audio Stealthbox®. It comes with one W6v2 12" 4-ohm dual voice coil subwoofer from JL Audio. The fiberglass shell offers superior rigidity while allowing more interior volume, so the sub can turn out louder, deeper bass. JL Audio craftsmen then laminate, grind, join, and finish each Stealthbox by hand. The end result: full-bodied, distortion-free bass from an impressively stealthy enclosure.
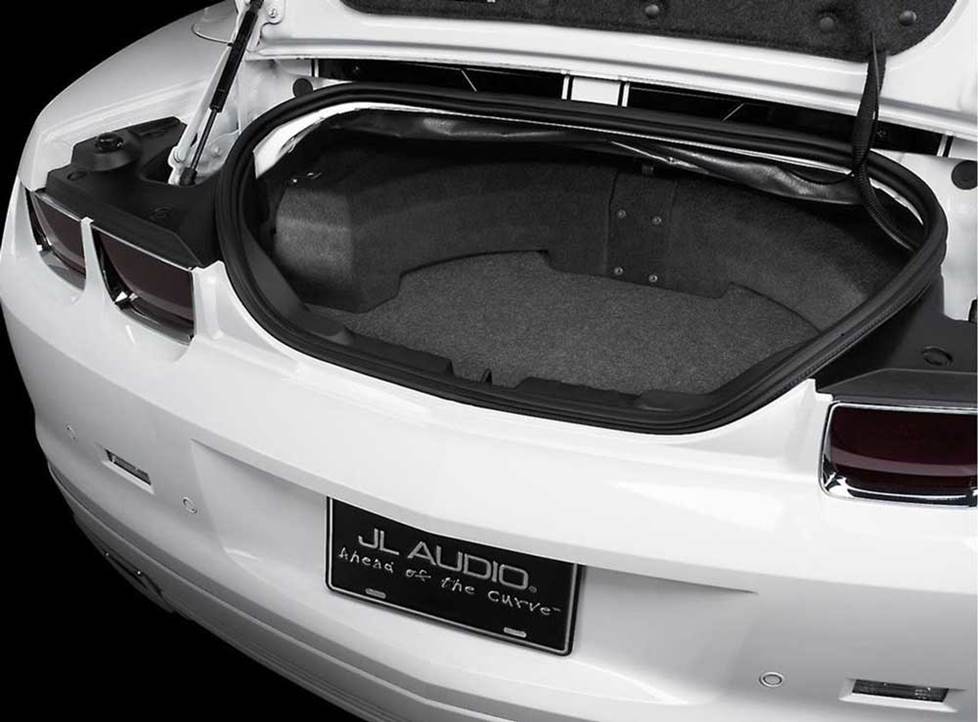
A JL Audio Stealthbox is available for the Camaro convertible
Convertible
The top has to go somewhere on sunny days, so the Camaro ragtop has even less trunk room than the coupe. The available space is 14"H x 24"W x 10"D, so you'll want to use a powered subwoofer or a custom-designed enclosure from JL Audio.
This JL Audio Stealthbox contains two 10" JL Audio subs in a down-firing sealed enclosure. It mounts in the trunk against the rear seat back and is carpeted to match the trunk trim. Overall impedance is 2 ohms and can handle up to 600 watts RMS.
Learn more about building a bass system in our Car Subwoofer Buying Guide.
Shop for vehicle-specific subwoofers for your Chevrolet Camaro
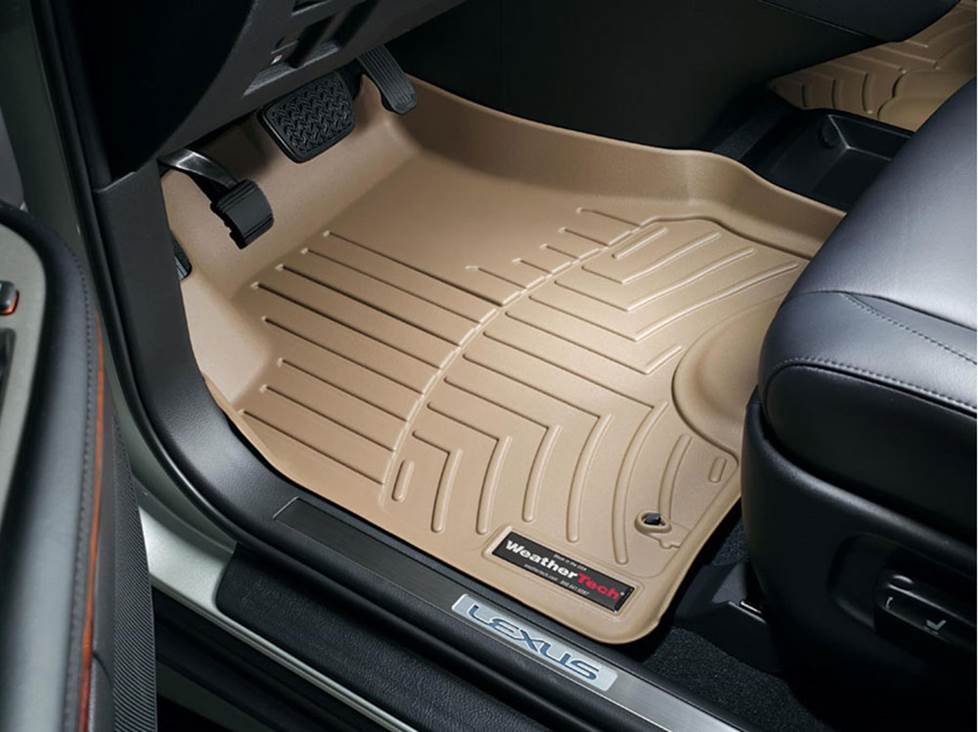
Keep your carpets looking sharp with a set of custom-fit WeatherTech floor liners
Other options for your Camaro
There are plenty of other ways to improve your Camaro. Here are some of the ways Crutchfield can help.
Protect the carpets with WeatherTech floor liners
It's easier than you think to mess up your Camry's interior while you're going about your daily business. Floor mats and liners from WeatherTech will help protect your car's carpeting from dirt and damage. And if they're already dirty and damaged, these mats will cover it up and make your car's interior a nicer place to be.
Add an amp (or two)
A new 4-channel amplifier will help you get the most out of your new speakers. You'll get cleaner power (and a lot more of it), which will result in much, much better sound. A mono amp can provide the juice you need for your new rear deck subwoofer, too. Learn more about adding amps to your system in our Car Amplifier Buying Guide.
Dynamat
If you're going to the trouble of replacing the receiver and speakers in your Camaro, you're obviously serious about sound. If you want to get the maximum out of your new stereo, consider a Dynamat 10435 Xtreme Door Kit. This heavy-duty noise damping material really makes a difference. One kit should take care of the Camaro's doors. If you're planning on an all-around stereo replacement involving the rear speakers and a sub, you might want to talk to your installer about lining the floorpan and the trunk lid as well. Might as well do it while you're tearing out the interior anyway, right?
Security systems
Installing a security system in your Camaro isn't easy (security systems rarely are), but it's definitely a good idea. Our Crutchfield Advisors can help figure out what you need to get the job done, but we usually recommend taking your car and new gear to a professional installer.
Let's get started!
Ready to shop? Use our vehicle selector to find the gear that will fit your car or truck. If you have questions, give us a shout via phone or email
Comments (9)
Please share your thoughts below.


James Holmon from Houston
Posted on 9/15/2023
I have a 2015 convertible. Non BA system. I cant find a wiring diagram for the harness going into the amp so I can tie into it. Do you have anything for this?
Jon Paul from Crutchfield
on 9/18/2023
AD
Posted on 2/18/2021
Question, I can't find the amp capacity in the manual. Will a factory amp handle pretty much any wattage when it comes to the interior speakers?
Jon Paul from Crutchfield
on 2/18/2021
Gabe from Orlando
Posted on 1/16/2019
Whew, this talked me out of anything but replacing the rear side 3-1/2" speakers (but why bother?). I've done engine work that's nowhere near this daunting! Good thing the stock BA system is at least half-way decent.
Jon Paulette from Crutchfield
Posted on 6/26/2017
Elliott, If you bought your gear from Crutchfield, you can call Tech Support for free help troubleshooting your system. If you purchased your equipment elsewhere, you can still get expert Crutchfield Tech Support - 90 days-worth for only $30. Check out our tech support page for details.
Elliott Watanabe from Vallejo
Posted on 6/25/2017
I have a 2013 Camaro with a standard head unit. Not the BA system. Installed six and a half coaxial KS kickers in the front. KS Kickers 6/9 in the back. They're being driven from my lc6i audio control. Which then goes to two amps. One Soundstream RN4.1400 Rubicon Nano. This amp runs the front and rear speakers at 4 Ohms. The other is a RN1.3000D driving two 12in Kicker Comp VR dual voice coil Subs at 1 ohm. I did leave the factory tweeters installed and of course the they failed after about 2 months. I disconnected the tweeters and now I'm buying kicker KS tweeters to replace them. Here's my problem now. When I play hard-hitting rock or heavy metal at approximately three-quarter volume or higher after a few minutes the volume of the rear speakers and possibly the fronts drops off. It doesn't drop off completely but I can hear a significant difference in the sound almost like they're muffled. If I turn the volume back down to a low setting or to zero then turn the volume back up the sound comes back like normal. But then again if I turn the volume back up it continues to reoccur. I've tried lowering the gains on both amps all the way down to zero. And turning up the level controls on the audio control. I tried all different types of settings with the gain and the audio control unit to no avail. I checked the output voltage coming from the head unit. I'm only getting 2 - 3 volts per speaker lead at 3/4 volume. Is this normal? Do you know what the output voltage should be?
Jon Paulette from Crutchfield
Posted on 2/13/2017
Sam, If you bought your gear from Crutchfield, you can call Tech Support for free help troubleshooting your system. If you purchased your equipment elsewhere, you can still get expert Crutchfield Tech Support - 90 days-worth for only $30. Check out our tech support page for details.
Sam from Victoria
Posted on 2/13/2017
I installed a Kicker750.1 amp and two Alpine SWS 12D2 subs and was hoping you might be able to let me know the Gain and X Over setting I should apply on the amp to line up with the Boston Acoustics head unit. Thanks, Sam
Jon Paulette from Crutchfield
Posted on 2/1/2017
Sam, The satellite radio is built into the stock receiver, but at the moment, there's no adapter for the stock satellite radio antenna. You'll need to install a new one, and it's included with any new satellite radio tuner (currently, the SXV300V1). You'll need to buy and install the tuner to get SiriusXM satellite radio with a new stereo.
sam from Madison
Posted on 1/30/2017
Very Thorough. I can vouch for the difficulty of the rear deck speakers in the coupe! Any clue where the factory XM module is located if we want to retain that antenna?